Networking & Remote Access
Configure remote access, LAN connectivity, SSL/HTTPS, and port management.
Remote Access Configuration
To access Minepanel from outside your local network:
1. Update Environment Variables
Edit your docker-compose.yml:
environment:
  # Backend - Controls CORS
  - FRONTEND_URL=http://your-server-ip:3000

  # Frontend - API endpoints
- NEXT_PUBLIC_BACKEND_URL=http://your-server-ip:80912. Using a Domain Name
If you have a domain:
environment:
  # Backend
  - FRONTEND_URL=https://minepanel.yourdomain.com

  # Frontend
- NEXT_PUBLIC_BACKEND_URL=https://api.yourdomain.com3. Restart Services
docker compose restartSecurity
- Always use HTTPS for production deployments
- See SSL/HTTPS section below for setup
- Make sure your firewall allows the required ports
- Don't expose ports publicly without proper authentication
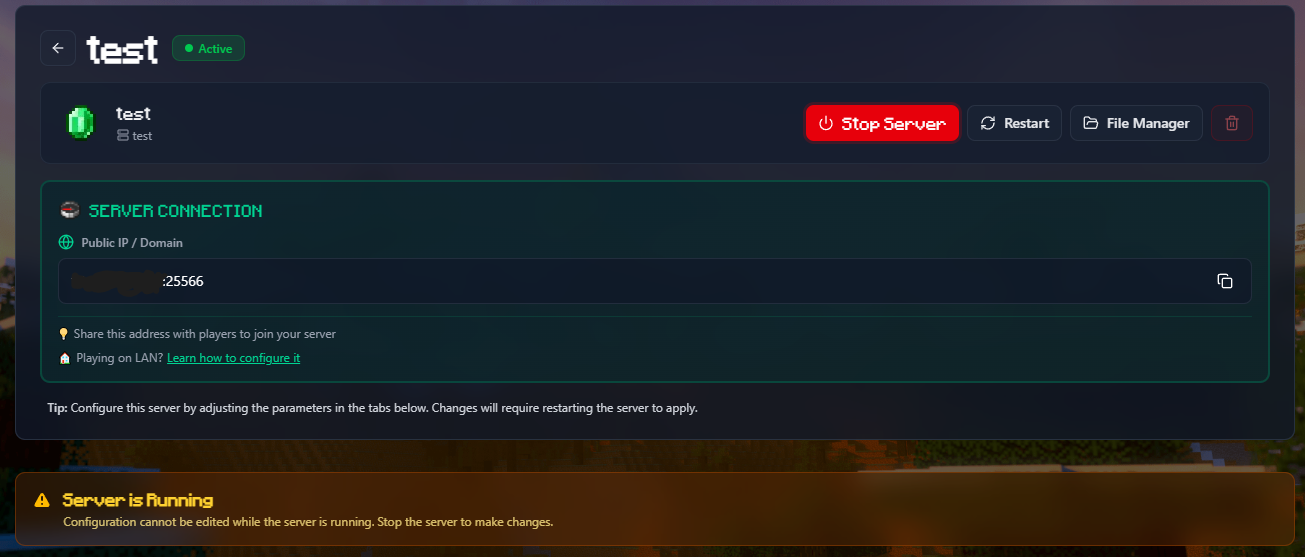
LAN Network Configuration
When you create a Minecraft server, Minepanel automatically shows the connection information to share with players. By default, it shows your public IP (obtained automatically via ipify.org). However, if you want players on your local network (LAN) to see your local IP address, you need to configure it manually.
Why Configure LAN IP?
- Better performance: Players on your local network will connect directly without going through your router
- No port forwarding needed: For LAN players, you don't need to configure port forwarding
- Both options: The panel will show both public IP (for internet players) and LAN IP (for local players)
How to Get Your LAN IP
On macOS:
ipconfig getifaddr en0
# Example output: 192.168.3.208On Linux:
hostname -I | awk '{print $1}'
# Example output: 192.168.1.100On Windows (PowerShell):
(Get-NetIPAddress -AddressFamily IPv4 -InterfaceAlias "Ethernet").IPAddress
# Example output: 192.168.1.50TIP
Your LAN IP typically starts with 192.168.x.x or 10.x.x.x
Configuration
Add the HOST_LAN_IP variable to your docker-compose.yml:
services:
  minepanel:
    environment:
      # ... other variables
- HOST_LAN_IP=192.168.3.208 # Replace with your actual LAN IPOr in your .env file:
HOST_LAN_IP=192.168.3.208Restart Services
docker compose down
docker compose up -dHow It Works
When a Minecraft server is running, the panel will show a Server Connection section with:
- Public IP/Domain:
203.0.113.50:25565(for external players) - LAN IP:
192.168.3.208:25565(for local network players)
Both addresses are easily copyable with one click.
INFO
If you don't configure HOST_LAN_IP, only the public IP will be shown. This is fine if all your players are connecting from the internet.
Port Configuration
Default Ports
| Service | Port | Description |
|---|---|---|
| Frontend | 3000 | Web interface |
| Backend | 8091 | API server |
| Minecraft Servers | 25565+ | Game servers |
Changing Ports
Edit your .env file or docker-compose.yml:
BACKEND_PORT=8091
FRONTEND_PORT=3000Port Conflicts
If a port is already in use:
# Check what's using the port
sudo lsof -i :3000

# Change to a different port
FRONTEND_PORT=3001Firewall Configuration
For remote access, open these ports:
# UFW (Ubuntu/Debian)
sudo ufw allow 3000/tcp   # Frontend
sudo ufw allow 8091/tcp   # Backend
sudo ufw allow 25565/tcp  # Minecraft (default)

# firewalld (CentOS/RHEL)
sudo firewall-cmd --permanent --add-port=3000/tcp
sudo firewall-cmd --permanent --add-port=8091/tcp
sudo firewall-cmd --permanent --add-port=8080/tcp
sudo firewall-cmd --permanent --add-port=25565/tcp
sudo firewall-cmd --reloadSSL/HTTPS
For production deployments, use HTTPS with a reverse proxy.
Using Nginx
- Install Nginx and Certbot:
sudo apt update
sudo apt install nginx certbot python3-certbot-nginx- Create Nginx config:
# /etc/nginx/sites-available/minepanel
server {
    listen 80;
    server_name minepanel.yourdomain.com;

    location / {
        proxy_pass http://localhost:3000;
        proxy_http_version 1.1;
        proxy_set_header Upgrade $http_upgrade;
        proxy_set_header Connection 'upgrade';
        proxy_set_header Host $host;
        proxy_cache_bypass $http_upgrade;
    }

    location /api {
        proxy_pass http://localhost:8091;
        proxy_http_version 1.1;
        proxy_set_header Host $host;
    }
}- Enable and get SSL:
sudo ln -s /etc/nginx/sites-available/minepanel /etc/nginx/sites-enabled/
sudo nginx -t
sudo systemctl reload nginx
sudo certbot --nginx -d minepanel.yourdomain.com- Update environment variables:
environment:
  - FRONTEND_URL=https://minepanel.yourdomain.com
- NEXT_PUBLIC_BACKEND_URL=https://minepanel.yourdomain.com/apiUsing Caddy
Caddy automatically handles SSL certificates:
# Caddyfile
minepanel.yourdomain.com {
    reverse_proxy localhost:3000

    handle /api/* {
        reverse_proxy localhost:8091
    }
}caddy startBehind a Reverse Proxy
Update all three critical variables:
environment:
  # Backend - CRITICAL for CORS
  - FRONTEND_URL=https://your-domain.com

  # Frontend - API endpoints
- NEXT_PUBLIC_BACKEND_URL=https://api.your-domain.comCustom Network
If you need a custom Docker network:
networks:
  minepanel:
    driver: bridge
    ipam:
      config:
        - subnet: 172.20.0.0/16

services:
  minepanel:
    networks:
- minepanelTroubleshooting Network Issues
Can't access from remote
- Check
FRONTEND_URLmatches the URL you're using - Verify firewall ports are open
- Check router port forwarding (if applicable)
- Restart after changing network variables
CORS Errors
The FRONTEND_URL variable controls CORS. It must match exactly how you access the frontend:
- Local:
FRONTEND_URL=http://localhost:3000 - Remote IP:
FRONTEND_URL=http://192.168.1.100:3000 - Domain:
FRONTEND_URL=https://minepanel.yourdomain.com
Always restart after changing: docker compose restart
Connection Refused
- Check Docker is running:
docker ps - Check logs:
docker compose logs - Verify ports aren't conflicting:
sudo lsof -i :3000
Next Steps
- Configure Administration Settings
- Set up Server Types
- Review Troubleshooting Guide